
How To Start Object Tracking in Arctos
If this guide doesn’t answer your questions, you can read this document
Object Tracking General Summary
Object Tracking in Arctos is a system that allows collections to track the location of specimen parts via a set of nesting containers (a tree) with or without positions. Barcodes are unique WITHIN Arctos and are used to track the containers. Containers may hold specimen parts or other containers. Containers also may occupy POSITIONS in other containers or may be position-less within other containers.
Important things to keep in mind when designing your barcode system include:
- A single cataloged item may contain multiple parts, depending on the type of specimen; e.g dried or fluid preserved material, microscope slides, photographs, frozen tissues, etc that may be stored in different locations or even different facilities
- The catalog number and the barcode should not be the same. Barcodes track the containers that hold the physical parts of specimens and because a single specimen can have multiple parts, individual barcodes are required for EACH part.
 Why can't I place a barcode on my herbarium sheet that is the catalog number?
You can do that. You can create barcodes that correspond to the web address of the specimen to make it easy for anyone to get to the specimen data, but if you want to use a barcode to track the location of your specimen, we recommend something other than the catalog number because object tracking barcodes need to be unique for each container. As soon as you come to a herbarium specimen that is prepared on two or more sheets (the sheets are the containers), using the catalog number for object tracking becomes problematic.
- Arctos Object Tracking is a parallel, integrated tracking system in Arctos. It can track any part or container independently of whether the item has been cataloged. As such, it can be set up at any point during the history of a specimen to track containers and specimen part locations from the moment of collection through accessioning, preparation, curation, cataloging, and loans.
- Arctos object tracking can be used to track anything that can be assigned a label or a barcode including: a. Specimens and specimen parts installed in the collection or in preparation prior to data entry and cataloging b. Uncataloged items c. Media (non-digital), or devices containing digital media d. Types of containers including rooms, cabinets, freezers, ranges, bays, jars, slide boxes, vials etc., as specified in the controlled vocabulary for container types
How do I change the labels on positions?
Every time I try it says positions aren’t editable. So in Freezer 2 I have position 1 and then under that I have freezer rack 1. Why the redundancy? Why isn’t position 1 just freezer rack 1?
The positions are empty spaces. “Freezer rack 1” is what goes into the space that is position 1 in the freezer. It seems redundant for the larger stuff, but the cryovial that goes into position 1 of a freezer box probaly won’t be labeled “cryovial 1” and really, the rack that goes into position 1 in a freezer doesn’t HAVE to be called “rack 1”, you could label it “woodrat tragedy tissues” if you want! Arctos object tracking owns the positions, you own what goes into them.
- When an item is cataloged and the part labels and barcodes are entered into the catalog record the specimen record will be linked with all corresponding part locations and places the object(s) within their container tree
- Labels and/or Barcodes can be used to track part locations a. Labels AND barcodes are mandatory if the object tracking system is to be used as designed b. Barcodes are highly recommended for large collections to minimize transcription error c. Barcodes may be 1D, 2D, RFID, base 10, base 36 etc; with human-readable text allowable d. Labels are prone to misspellings and/or duplicates which hinders search and tracking 7 .Barcodes must be unique values across all collections. Because Object Tracking is a shared system, barcodes must be claimed in advance to avoid duplicates across collections.
Some important features of object tracking in Arctos include:
- Specimen results from the Arctos search page can link directly to part locations for review or download
- Part locations can be downloaded into a flat file
- Part locations and barcodes can be used to track accessions and add parts to loans
- A csv list of barcodes or labels can be used to search for the positions of multiple objects simultaneously
- All "children" of a container can be moved at once to another "parent", without having to scan each barcode individually
- Scanning or moving an object or container into another object or container automatically deletes the object from its previous position
- Objects cannot be deleted from a position; they can only be moved to a different position, which provides a position history for each container
- Dimensions of containers provide constraints so that a large object cannot be scanned or moved into a smaller object
- Label information can be searched with a wildcard character (%) to locate a partial text string, (e.g. find "Shelf_1_A_%")
- While barcodes are constrained to be unique across all Arctos institutions, each institution can only move or edit their own barcodes, containers, and parts
Planning for Object Tracking
Develop your Container Set
Before beginning the process of ordering barcodes or barcoding supplies consider the structure of the container tree that you will be using. A standard use of barcodes is to track the location of cryovials of tissue. A nesting tree for such a system might look like this:
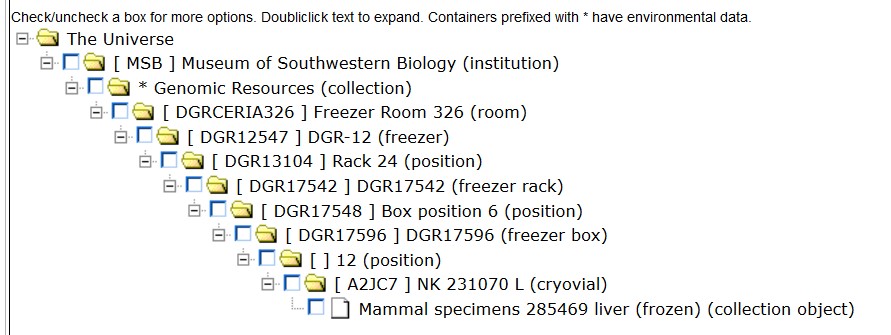
Trees in Arctos appear with the root at the top and the leaves are the specimens in the final container ( the “leaf container”). This tree shows the location of the liver tissue from MSB:Mamm:285469
 which is in a cryovial with the barcode A2JC7
 which is in position 12 of the freezer box with the barcode DGR17596
 which is in position 6 of the freezer rack with the barcode DGR17542
 which is in position 24 of the freezer with the barcode DGR12547
 which is in Freezer Room 326 (a position-less container)
 which is in the Genomic Resources Collection (a position-less container)
 which is in The Museum of Southwestern Biology (a position-less container)
 which is in “The Universe” (a position-less container)*  _*the Universe is the largest container in Arctos, the location of all barcodes that are not assigned a position by a collection_
As you plan how you will use barcodes, it is important to remember that barcodes are used to track CONTAINERS as well as to consider how the nesting of containers will help you manage your collection. Once you have built your tree of containers, the next step is to determine how you want your barcodes to look.
Develop your Barcode Series
Barcodes are primarily meant to be machine-readable labels for containers, but for many of the containers you plan to track with a barcode, having a human-readable format can be helpful. Barcodes for rooms, shelving units, shelves, freezers, freezer racks, jars, boxes, and other large containers will probably be more useful if they can be read by a human and make some sort of sense. For other containers, a compact random set of characters works best. This generally includes small containers such as cryovials and insect pins. Often a collection will use some of both kinds of labels as is demonstrated in the tree above where:
Large containers use barcodes that begin with a code that makes sense for the collection (DGR stands for Division of Genomic Resources) and end with a series of five digits. This leaves room for up to 99,999 unique large barcode labels for the collection. Small containers (cryovials) have a randomly generated combination of capital letters A-Z and numbers 0-9 in the range “A plus any four upper-letters or numbers”. This provides the collection with 1,679,616 (364) unique barcodes for its cryovials
Creating a count of containers to which you will need to add each barcode type, then designing your barcode series accordingly while leaving room for potential future growth will make your experience with object tracking in Arctos much more pleasant. Before proceeding any further:
Read the Documentation on Guidelines for barcode-containing labels
Read the Documentation on Barcode Series
Claiming Barcode Series
Barcodes are shared between institutions and departments therefore they must be unique across ALL Arctos institutions and collections. You can post an issue to GitHub to request a barcode series, or if you are adventurous, you can follow the steps below to research a claim a barcode series yourself.
These steps allow you to see if the barcode series you want is already used in Arctos, and if it is not, how to claim that series.
Navigation: Tools Directory > Barcodes & Containers > Barcode Series: Reserve
- Test the barcode that you want to use before staking a claim. If a row highlights in green, that barcode is already in use and you will need to come up with a different barcode series.
- If nothing turns green, you can claim that series. BEFORE you click "stake a claim", if you have no experience writing SQL, we suggest you find a barcode series that is similar to the one you want to claim and copy the SQL code. You can then edit that SQL to write what you need to claim your series.
- Clicking on "stake a claim", you will be taken to a page where you will create your barcode series
a. Paste in your copied SQL and edit it in the top box
b. Using text, describe what these barcodes are going to be used for
c. Select your institution from the drop down menu
d. Notes are optional but it is helpful to provide what department, type of barcode (2D, 1D), in-house or vendor printing, etc. You can look at notes others have added on the previous screen to get an idea
e. Hit CREATE! - Repeat steps 1 and 2. Hopefully, your entry will now turn green. If it does not, the SQL is not correct and you'll need to correct it. If it turns green, proceed on!
Select your Digital Barcode Format(s)
Barcodes come in two formats
1D Barcode:  2D Barcode:
1D Barcodes are well-suited for larger barcode series while 2D Barcodes can be used for any size. For any situation where printed barcodes will be small (cryovials, insect pins) 2D Barcodes are preferable. You will likely find that you can either use 2D Barcodes for everything or you will use 2D for smaller containers and 1D for larger.
Select your Barcode Scanner
Barcode scanners come in many shapes and sizes. The main thing to remember when purchasing a scanner is that some scanners will not read 2D Barcodes, so if you plan to use 2D Barcodes, make sure the scanner you choose will be able to read them. A list of suppliers used by Arctos Collections can be found in the RESOURCES section of this document. Also, be aware that some scanners may be specific to an operating system, so also check to make sure the scanner you choose will work with the operating system of the computer that will be used with the scanner.
Select your Physical Barcode Medium
Adhesive or Non-Adhesive
Barcodes can be printed on adhesive or non-adhesive media. It is important to consider the container on which the barcode will be placed when selecting a medium. Some containers require an adhesive label (cryovials, freezer boxes, freezer racks) while others work better when printed on a non-adhesive medium which can then be placed in a container (fluid storage jars) or in a label holder on a container (sign on a room or magnetic label holder on a shelving unit). Remember that adhesive medium durability depends on the material and the adhesive.
Submerged Barcodes
XyResist® Plastic or Chemical Resistant Polyester Labels can be used with alcohol although we have not tested it for long term submersion.
Frozen Barcodes
CryoLabel® plastic labels are recommended for use in liquid nitrogen and ultracold freezers.
If you are unsure about any medium that you are considering, consult with the supplier and if they are unable to make a recommendation, post an issue to the Arctos GitHub to seek advice before you buy.
How Many and What Size and Shape?
As part of this decision, you will also need to consider the size and quantity of each barcode you expect to need.
Quantity
In general, it is good practice to print at least two labels with each barcode that will be placed on the “leaf containers” of the nested tree. This allows you to place a barcode on the container and another on a page of a paper catalog or an inventory of specimens to be cataloged. Some collections print three adhesive labels for cryovials; one circular label for the cryovial lid, one circular label for the paper catalog, and one wrap-around label for the cryovial. Duplicate labels can be problematic if you don’t have a planned use for them, so make this decision with care and ensure that placement of all copies of any given barcode are written into your barcoding procedures so that two different leaf containers don’t end up with the same barcode. This generality may not be applicable in some situations, such as with leaf containers that house more than one specimen (a jar of frogs).
Size and Shape
When thinking about label size, consider whether containers are of uniform size. When containers that will use the same barcode series are of variable sizes it might be important to order media that is sized to fit the smallest container (skeleton boxes may be 1” x 1” x 3” or 1’ x 1’ x 3’). This will allow you to use a single, printed series on all of the containers of a given type. For most applications, rectangular or square barcodes work fine, but for cryovials you may want a circle that fits the lid of the vial.
Select your Barcode Printing Method
Barcodes can be pre-printed by a vendor or you can print them yourself. As with selecting a medium, it is important to consider the container on which the barcode will be placed when selecting a printing method. For containers that require an adhesive medium, a small barcode label, or where the printed barcode will be immersed in fluid, pre-printing by a vendor may be preferable as special printers, ink, software, and medium may be required to print them in-house. For barcodes that will be larger and do not require adhesive, in-house printing is much less expensive and allows multiple copies of a barcode to be printed (as when a printed barcode is mutilated or destroyed or if it is assigned to a new container).
With both options, be aware of possible duplicates whether through ordering duplicate barcodes or through printer error.
Document Your Plan
As you answer the questions above, document your decisions and review everything before you place orders with vendors. Have others who will use the locator system in Arcos review the plan as well to make sure you haven’t missed some detail about how those in your museum expect to use the barcode/locator system.
Draft written processes for barcoding items already in the collection as well as how new items coming in will be added to the locator system. This process will help you work through all of the decisions above and will prevent surprises that require you to re-print barcodes, order additional copies, or re-start the process from the beginning. Consider presenting your plan and process drafts to experienced users of barcodes and object tracking in Arctos. You may get excellent feedback (and you may teach them something!).
Purchase, Print, and Prepare
You have created your object tracking in Arctos plan and claimed your barcodes in Arctos, now you are ready to purchase, print, and prepare for adding barcodes to your containers. If you are ordering pre-printed barcodes be sure to test one as soon as they arrive. You can test both your scanner and barcodes by scanning a barcode into a cell of an Excel spreadsheet. Make sure the barcodes are part of the series you have claimed in Arctos! If you are printing barcodes in-house, you should also test them with your scanner. There are several ways that you can generate and print your own barcodes. See the Resources section of this How-To to find out more about them.
Create Containers
See How To Create and Edit Containers
Move Containers
Currently all of the barcodes you created are in the "Universe". It is perfectly fine to leave your barcodes here until you apply them to a container, but you may want to move them to your Institution or some other location (The room or cabinet where they are stored might be logical choices). To accomplish this in bulk, you will use Move Container Batch Scan which requires that you prepare a CSV file with the appropriate relationship information.
- In excel, create a document with the headers BARCODE and PARENT_BARCODE
-
Fill in the columns with information as follows: A) BARCODE is the child barcode - it is underneath/nested in the parent barcode B) PARENT_BARCODE is the barcode directly above the child barcode
EXAMPLE: Universe is the parent barcode to the child barcode University of Alaska Museum. However, University of Alaska of Alaska Museum is parent barcode to UAM Genomic Resources Room 20 NOTE: Both the child and parent barcodes must exist in Arctos for this process to work
- Save file as CSV
Now you are ready to load the information into Arctos
- From the Arctos main menu select Arctos → Manage Data → Object Tracking → Move Container
- Click on "Batch Scan" at the top
- Click on "Upload CSV file"
- Select the file you created above
- Click the Upload this file button
Alternatively you can move barcodes one at a time or in batches by scanning them into the appropriate parent barcode using the NON-BULK WITH BARCODE SCANNERS function which is generally used to scan objects into their location when only a few objects at a time are being moved.
NOTE: Before scanning barcodes, set your scanner to tab after scan so that you can moreeasily move to the next field when scanning.
- From the Arctos main menu select Arctos → Manage Data → Object Tracking → Move Container
- Click on "Batch Scan" at the top
- Place your cursor in the Parent Barcode field and using a scanner, scan in the Parent Barcode (shelf, tray, etc.)
- Place your cursor in the first "scan barcode" field and scan the first object barcode you want to move into the parent (shelf, tray, etc.). Continue the process until you have all of the children scanned in. The scanner will automatically move you to the next blank field if it is set on Tab.
- When you are done, click the tan box to SAVE
Placing Parts in Containers
Barcodes are placed on containers and designate only the container. In order to track object parts, they must be placed in a barcoded container. There are several methods for placing an object part in one of your barcoded containers. The method you choose will likely depend upon the number of parts you want to place in containers
- a)From specimen page
- b)Faster to use Manage Data→ Object Tracking → Object+BC\>\>Container
- i)Check boxes at top
- ii)Add new part from this screen
Alternately, you can add a part from the Specimen Record under Edit Parts:
Searching for Barcodes and viewing locations in Arctos
- a)From Search Screen
- i)Search Results page: Manage… → Part Location 1. 1)Hierarchical view to flatten parts
ii) Specimen page: Parts: PLPath, Barcode edit, and Part Locn. button
- b)From Manage Data→ Object Tracking → Find Container
- i)Barcode vs. IN Barcode
- ii)Has Children 1. 1)Explain parent/child
Resources
Vendors
Electronic Imaging Materials used by University of Alaska Museum of the North and Museum of Southwestern Biology for their barcoding needs. BarcodesInc Barcode Giant CILS International eBarcode
Scanners
Wired 1&2D Scanner: Zebra DS6708-SR Handheld 1&2D Digital Imager $380 Cordless (Bluetooth) 1&2D Scanner: Socket CHS 7Xi 1&2D Cordless Bluetooth® Scanner $540 Wired 1D Scanner: Symbol LS2208 Economical Handheld Scanner & Stand Kit $155 For used barcode scanners and other supplies at a discount, check out eBay. You can find these scanners used for a significant discount. You may also want to check with your IT department as they may have scanners available for you to borrow.
###Preprinted Labels
Preprinted barcode labels can be purchased from Electronic Imaging Materials(EIM). Contact customer service for help to design and customize your barcodes.
In-House Printing Equipment
From Electronic Imaging Materials, UAM purchased a TSC TC300 (300 dpi) Desktop Label Printer that comes with BarTender Lite software for designing and printing barcodes. The program allows you to create barcode series and remembers the last barcode printed to reduce printing of duplicate barcodes. When purchasing barcode rolls, select Thermal Transfer print method. More information on Direct Thermal and Thermal Transfer Labels can be found on the EIM webpage. The TC300 printer takes a 1” core size. For different sizes of barcodes than found on the website and for more information on getting setup to print, contact EIM customer service.
In-House Barcode Generation
Barcodes can be generated from text in several different ways using readily available software.
Microsoft Word
Microsoft Word has barcode creation capability built in and a tutorial is also available (Arctos is not responsible for the content – it is a bit sarcastic).
Or you can download a barcode font, add it to your Microsoft Word font list, and type up whatever barcodes you want.

To find a barcode font, Google Barcode font for office or something along those lines. You can also find them at http://www.fontspace.com/category/barcode. Select a Code39 as it works best with most barcode scanners.
To add a barcode font to your Microsoft Office Word, follow the instructions at PC: https://www.wikihow.com/Add-Font-in-Microsoft-Word for PS or https://www.popsugar.com/tech/How-Install-Fonts-29788862 for Mac.
Creating a Barcode in BarTender if you are using a barcode printer
**This section is a work in progress.
BarTender is a software package that comes with barcode label printers. UAM runs the UltraLite version that comes free with the barcode printer whereas MSB runs an upgraded version. This is basic how-to is for the UltraLite version and is a work in progress as we learn how to use the program ourselves. When I have questions about using this program, I have found that the online how-to videos I google have been very helpful.
- Open BarTender UltraLIte on computer
- Select "start a new BarTender document"
- Select Blank Template and hit next.
- Select printer, default is currently TSC TC300 (the barcode printer)
- Stock Selection, select specify custom settings a. Rows= 1 Columns=1, once you click next there will be a image to show to check if the setup looks correct
- Side Edges: use a ruler to measure the space on the edges of your roll. Enter the value for the left and right. For current selection of barcodes it is about 1/16" or 0.062".
- Printed item shape: select shape that best describes your barcode. Most are rounded rectangle.
- Template size a. Enter the width and height of your barcode. For height, this is the barcode plus the space on top and bottom of the barcode. b. Select the orientation you want to print your barcode. c. Select effect if you are using it.
- Template background - leave blank unless you want to get fancy.
- Select the 123 Barcode from the top menu a. Select barcode font Code 39 b. Draw your barcode
- To edit barcode a. To edit barcode number, right click and select edit b. Right click on barcode and select properties i) To change the width of the barcode, go into Symbology and Size. Edit X Dimension ii)To serialize: Select data source, your barcode number and go to tab Transforms c. Click on button to the right of serialization field d. In dialog box, set it up
More Related Arctos Documentation
Arctos Documentation: Containers
How to Assign a Barcode to an Individual-Specimen Part
How to Bulkload Barcodes to Specimen Parts
How to Create a Freezer Box Container
How to Install Tissue Cryovials Into a Freezer Box
Examples of Barcodes and Containers in Arctos
Edit this Documentation
If you see something that needs to be edited in this document, you can create an issue using the link under the search widget at the top left side of this page, or you can edit directly here.