
How To Upload Media to TACC
The Texas Advanced Computing Center (TACC) offers media hosting for Arctos users through an Arctos Project allocation. If you are using TACC to store media, the files must be uploaded to TACC and accessible on the web server before creating media in Arctos. There are three ways to upload media to TACC: Single file uploads, small batch uploads, and large batch uploads. This document covers all three.
Single File Uploads
If you have a single media file to upload, you can upload it through the attach/upload media link found on any specimen or agent page which will automatically create an association between the media and the specimen or agent you are viewing. You can also upload a single file from the main Arctos menu through Search>Media/Documents> and selecting the Attach/Upload Media link at the top of the search form. Note that when using this method, no relationships are created to the media, so the only way you will be able to find it is with the information you provide during the upload. You will need to edit the media to add relationships after the upload is complete. Any media can have additional relationships added after initial upload, so if your media represents a collecting event, project, or loan, you may want to upload it to the agent who created it, then edit it to add those relationships.
Large Batch Uploads
If you want to upload a lot of large media files (e.g., 100s or 1000s of images, audio, video), and/or if you have specific processing needs, you should first contact an Arctos administrator to discuss space allocations. Begin by completing a request in Github. If you already have a dedicated directory in the Arctos allocation, follow these instructions:
- Create a TACC User account through the TACC User Portal. Direct link: https://portal.tacc.utexas.edu/account-request
- Once you have created a new account, it may take 24 hours or so for the account to become active. You should receive an email when your account is approved and ready
- Email your account username to Elizabeth Wommack (arctos.communications@gmail.com), TACC Project Manager for Arctos, so that she can add your user account to the Arctos Project allocation. NOTE: MVZ Users are added to the MVZ Media & Archives Project.
- You will need an SFTP (Secure File Transfer Protocol) program in order to access the Corral system on TACC where Arctos media are stored - see the TACC Corral User Guide
- On the left you’ll see Transferring Files Using Cyberduck - download Cyberduck or use another SFTP program
- Set up a transfer protocol:
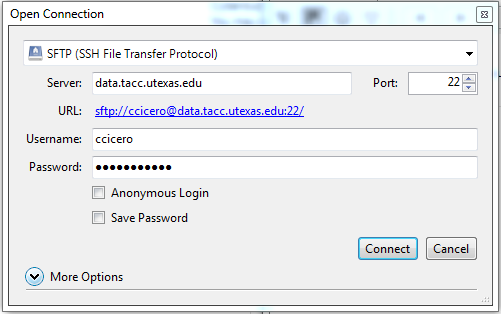
- Open Connection
- Select “SFTP” from dropdown
- Server Host Name: data.tacc.utexas.edu
- Username: enter your TACC portal username
- Password: enter your TACC portal account password
- Port number is 22
- Once you connect, you will be prompted to enter a TACC Token Code. In order to do this, you will need to install the TACC Token app for multi-factor authentication. Read the TACC instructions on this process. After you are set up for authentication, enter the TACC Token at the prompt.
- If you have successfully entered the TACC Token, you will be taken to your directory. Go up to the root directory and then select corral-tacc > projects > arctos
- Each institution should have a directory for their media in https://web.corral.tacc.utexas.edu/arctos/
- Within that directory, you can organize your media files however you want
- Internal path /corral-tacc/projects/arctos/web/ writes to external path https://web.corral.tacc.utexas.edu/arctos/
 Pro Tip
Read Best Practice - Managing Directory Structures in the Arctos Project Allocation at TACC
We consider it a best practice to create “daily” folders to manage your files beyond any shared folders
for example
https://web.corral.tacc.utexas.edu/arctos/{institution_acronym}/collection_or_whatever/some_project/maybe_other_stuff/{yyyy_mm_dd}/
institution_acronym (for Arctos accounting) and the dailies (for everyone’s sanity) are the important parts, the “project folders” in the middle are entirely optional, but if they are to be shared, they should be created by the TACC-authorized manager.
It is also a best practice to avoid spaces in your folder and file names.
 Caution
- Directories created by a user other than the Arctos DBA may only be written to or edited by the user who created them.
- Files loaded to TACC in this manner are immediately available on the web and available for use in the Media Bulkloader (or alternate tool of your choice).
- There are currently no postload processing tools in place. If you have .tif files but want to make .jpg public, you should convert the files locally and upload the .jpg files.
- Files loaded to TACC in this manner are NOT automatically associated with anything in Arctos. You must bulkload media metadata or associate the files with data in Arctos manually by creating media. Be sure that you have files named so that you can easily relate them to catalog records, events, agent, taxa or whatever you wish them to appear with in Arctos and that you can include appropriate descriptions and lables in the media metadata. Media loaded in bulk should use the root url https://web.corral.tacc.utexas.edu/arctos/
Once you have created media for the files in Arctos, thumbnail images will also be generated when possible by scripts in Arctos. If you want to ensure thumbnails are available, create them and upload them along with the originals. You will need to use those thumbnail URIs in your bulkload media template (in the PREVIEW_URI column, http://arctos.database.museum/tools/BulkloadMedia.cfm) when you bulkload the image URIs.
Related Links
Documentation
Other How-Tos
Tools
- namechanger is useful for renaming files on Mac.
Tutorial Videos ↗️
How to Transfer Media to TACC (Bulk Media Loads)
Edit this Documentation
If you see something that needs to be edited in this document, you can create an issue using the link under the search widget at the top left side of this page, or you can edit directly here.