
How To Barcode Cryovials in an Existing Freezer Box
You have claimed your barcodes in Arctos and ordered or printed them, now you are ready to open a freezer and start using Arctos to track your specimens. This document includes a workflow which you may need to modify slightly depending upon how the information for what is in your freezer boxes is currently stored and whether or not you purchased or printed duplicate barcodes.
Barcode Freezer Box
Attach a box barcode to the freezer box
You may need to scrape off ice with a Kimwipe or the back-end of tweezers so that the label will adhere to a cold box. At MSB, we always attach the barcode label to the side of the box that corresponds with the “bottom” of the positions grid printed from Arctos, which would look like this:
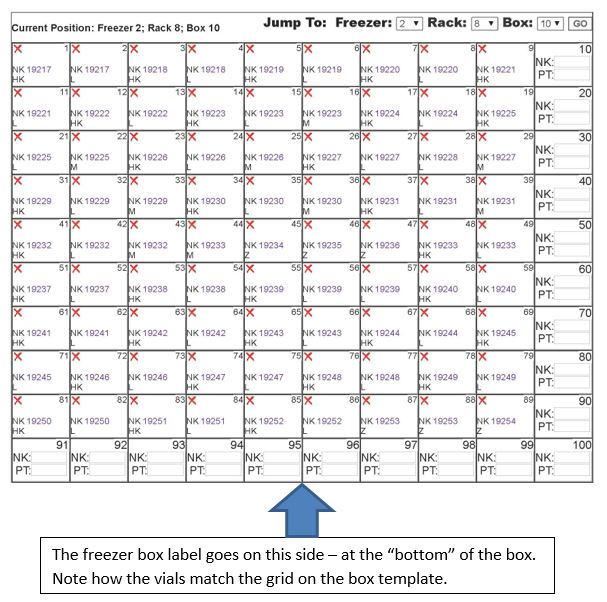
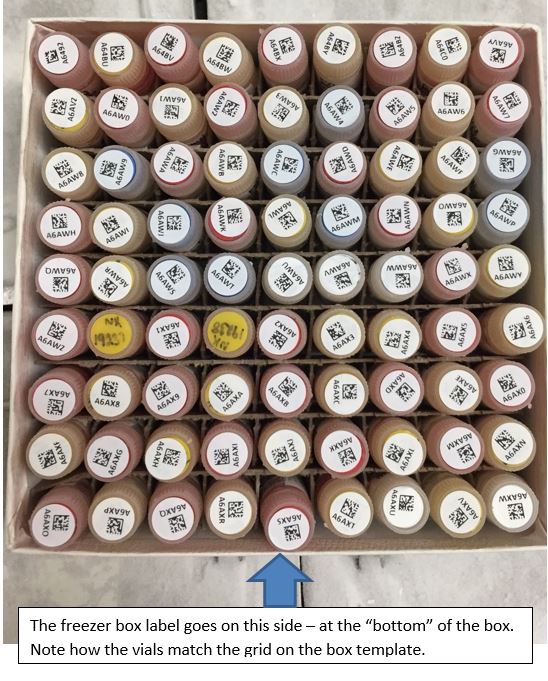
and corresponds to the final box like this:
Create the freezer box in Arctos:
- Go to Manage Data > Object Tracking > Find Container
- Scan in the new Barcode label in the barcode field at left and select search, the barcode should be a container label in the Universe
- Check the box next to the Barcode label in the tree view
- In the panel that appears at the right of the screen, select “Edit this container”
- Label and Barcode should be the same unless otherwise indicated
- Change Container Type to: freezer box
- Dimensions: measure your freezer boxes, or if you choose to use a standard (width = 13 cm, height = 5 cm, length = 13 cm) generally works: keep in mind that the boxes may eventually be installed in racks and if dimensions are assigned to the racks, the box dimensions cannot exceed the rack positions into which they will be installed
- select one of the pre-filled freezer box types (10x10 or 9x9) or create your own position grid
- Add a description if it will be useful to you: describing the type of freezer box (cardboard, plastic, etc) or providing manufacuterer information can be useful later
- Add a remark if you have additionali nformation you would like to remain with the box. Pre-Arctos freezer history or notes about the box itself (lid torn) are some of the remarks we have used
- Select “Save Container Edits”
Move the freezer box to the correct location in Arctos
If you have already set up your freezer, now is the time to move the new freezer box to the correct location in Arctos. If this is not the case, you can perform these steps later when your freezer has been set up.
- Enter the barcode of the freezer rack position on which you are working; e.g. DGR2_33_1 into the Move to Barcode box
- Select “Save Container Edits”
OR - Find the freezer rack into which the box will be placed and scan the box barcode into the appropriate position
- Search the new barcode to be sure it is in the correct location in Arctos
Barcode Cryovials
You are now ready to barcode the cryovials. At MSB, we have the information for each freezer box in an Excel sheet. We use this sheet to record the position of each cryovial in the freezer box, the type of identifier used to match the sample with a specimen, the catalog or other identifier number that matches the sample in the vial with a specimen, the tissue that is in the cryovial, and the barcode that is placed on the cryovial. This spreadsheet can be used later to create custom labels for the cryovials and to associate the barcodes with the appropriate specimen parts in bulk rather than one-by-one.
Prepare the physical freezer box
Pull the box out of the freezer and place it in a cooler with ice packs frozen at the same temperature as the freezer from which your freezer box was removed for barcoding. At MSB we stress that the box of tissues must always be on ice and if the tissues have been out too long (more than 30 minutes), we ask students to put the box away and allow it to re-cool for an hour. We also use gloves and/or tweezers to reduce handling and warming of the vials.
Prepare the Arctos freezer box
- Go to Manage Data > Object Tracking > Find Container
- Scan the box Barcode label into the barcode field at left and select search
- Check the box next to the Barcode label in the tree view
- In the panel that appears at the right of the screen, select “Edit this container”
- Select “positions” at the top left corner of the Edit Container page. You will now see a “map” of your freezer box in Arctos
Barcode the Cryovials and Record Content Information
At MSB we organize all freezer boxes with position 1 in the top left corner of the box, with the first row containing position 1 through 9 or 10 and position 10 or 11 resides just below position 1 depending upon whether the box is 9x9 or 10x10. The barcoding process follows this pattern as well.

-
Beginning at the top right of the box and proceeding from left to right, then down to the next row, complete the following for each cryovial in the box:
- Add the catalog or other identifying type to the appropriate column in the Excel worksheet
- Add the catalog or other identifying number to the appropriate column in the Excel worksheet
- Add the tissue type to the appropriate column in the Excel worksheet
- Place the barcode on the vial
- Dry off the tube with a Kimwipe. Do not cover numbers written on the tube with the barcode sticker
- If you are using wrap-around barcode labels, you will need to dry the side of the tube and try to put the clear overlay of the barcode sticker over any writing on the tube
- Scan the barcode into the appropriate cell in the Barcode column of the Excel worksheet
- Scan the barcode into the appropriate cell of the box position “map” in Arctos (note: set your scanner to tab after scan and the cursor will move to the next cell in the box, otherwise you will need to place the cursor yourself)
- If you have any comments about the writing on the tube or the tube itself, enter them into the Remarks cell of the Excel workbook
Refreshing the freezer box “map” will allow you to see what has been scanned into the box. When you are finished barcoding all of the vials, refresh the freezer box “map” to be sure that the virtual box in Arctos matches the physical box.
Return the box to the freezer and save the Excel Workbook. You are now ready to:
Create Cryovial Labels and Associate Barcodes with Specimen Parts
Edit this Documentation
If you see something that needs to be edited in this document, you can create an issue using the link under the search widget at the top left side of this page, or you can edit directly here.